Showing posts with label recipe. Show all posts

Saturday, February 1, 2025

Dulce de Leche Cheesecake

 Cheesecake (noun)
a dessert consisting of a creamy filling usually containing cheese baked in a pastry or pressed-crumb shell

Back when I started this blog I used to include the definition of a word at the end of each post.  As I blogged more frequently, the practice became mostly extinct.  The last time I posted a cheesecake recipe (Caramel-Nut Shortbread Cheesecake) was in 2015, but I assure you I have made my fair share since that time.  But back to the definition, when I looked it up I was surprised by two things: 1) the phrase "usually containing cheese" and 2) the second definition, which I have never heard used (they compare it to how we use the term "beefcake").  Since the word has been around since the 15th century and I was intrigued I admit to spending several minutes searching the web for recipes from back then (and yes, every one I found used cheese, so the mysterious definition remains).

Anyway, as is my typical process, when my Mom asked me to create one for Family Lunch I began contemplating the ingredients I had on hand and what recipes I could meld into something new.  Yes, much to the chagrin of my youngest brother, I rarely follow a recipe exactly as written down.  So many areas of life require strict discipline, but I do not believe that cooking is one of those areas.  If you made it this far and would like to simply print the recipe, you can do so here. For the usual food-blog step-by-step with photos and narration, read on friends!

DULCE DE LECHE CHEESECAKE

Crust Ingredients:
1 pkg/sleeve of graham crackers, crushed or 1 ¼ cups graham cracker crumbs
7-8 TBSP (1 stick) of melted butter
pinch of salt
2 TBSP sugar (optional)
1 cup (12oz or 13.4oz can) Dulce de Leche.  You can sometimes find Dulce de Leche near the sweetened condensed milk or in the international aisle at the grocery store.  Otherwise, try out this recipe for making your own and then let me know how it worked!

Filling Ingredients:
4-8oz white chocolate chips or chopped bar
(4) 8oz pkg of cream cheese (softened to room temp)
1 cup of hastily poured brown sugar (unpacked). White sugar is also fine, but I wanted the contrast between the batter and the white chocolate bits (it didn't work, but I tried).
4 large eggs
2 TBSP all-purpose flour
1 tsp pure vanilla extract
½ tsp salt

Ganache/Glaze:
4 oz. bittersweet chocolate (chips or coarsely chopped bar).  Feel free to use an entire bag (in which case double the other ingredients), but you honestly do not need more.
¼ cup (4 TBSP) butter, cut into pieces
1 TBSP heavy cream
Caramel sauce/topping (optional, I simply had some on hand and thought it went well with the bottom layer of dulce de leche carmely-ness)
Coarse sea salt (optional, I simply had some on hand)

  • Start by preparing your 9" spring-form pan. If using a water bath, wrap the bottom of the pan in foil (and test that you have another pan large enough to house the pan and the water). 
  • If your white chocolate is in a bar, coarsely chop it and set aside.

  • Preheat oven to 375F. Melt your butter (however you prefer) and then stir it together with the graham cracker crumbs. Evenly spread out the crust mixture into the pan and then press firmly into the bottom of the pan (I like to use some plastic wrap or wax paper on my hand, but it isn't necessary). Bake for 6-8min; remove the pan and then lower temperature to 325F. 
  • Open the can of dulce de leche and spoon out onto the crust (it will be very thick and unwieldy). Try to gently spread it around to make an even layer (the warm pan/crust should help, but it need not be perfect). Set aside to cool, refrigerating is optional.

  • If you plan to use the water bath, boil water (a tea kettle is handy for this). If you'd rather not bother, I think it's fine.  I've made cheesecakes with and without the water bath and as you can see at the end here, I still had cracks (I think I overcooked it or should have put it on the bottom oven rack).  Since we're covering any cracks that appear on the top of our cheesecake with ganache...well, you decide.
  • In a large bowl, with a hand mixer, beat cream cheese and sugar together. Add eggs, one at a time, then flour, vanilla, and salt. Attempt to uniformly pour about ½ of the filling onto your crust, then gently encourage the batter to the edges of the pan with a spatula. Mix your white chocolate into the remaining batter in your bowl and then repeat filling up your pan – smoothing the top as much as possible.

  • Place your springform pan into your water bath pan and gently pour the hot/boiling water into the sides of the main pan, being careful the water level doesn’t reach the foil level.  You want a few inches of water up the side of the spring-form pan, but it's an art, not a science (according to me, anyway). Carefully transfer the cheesecake & waterbath into the oven and bake about 1 hour and 20min (until the center only slightly jiggles).
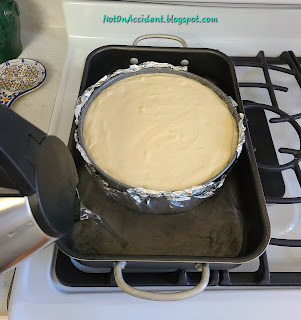
  • While the cheesecake is baking, wash your dishes. Yep, you’ll appreciate it when they’re done, plus there is plenty of time to wait. Once the cheesecake is finished baking, turn off the oven, prop open the oven door (a wooden spoon is good for this) and leave the cheesecake inside to cool for an hour. Then remove the cheesecake and depending on the temperature, allow it to set for another 30-40minutes while you create the glaze.
    Despite the water bath, it still cracked, but I believe
    that is because I didn't put it on the bottom rack.


  • NOTE: If you will be presenting this cheesecake outside of the pan, refrigerate it for several hours (or overnight) and remove from the spring-form pan prior to glazing (allowing the glaze to drip down onto the sides for a classy presentation).
  • Heat the chocolate, butter, and cream in a double boiler (or in the microwave at 30 second intervals), stirring until smooth. Allow the glaze to cool for about 10 minutes and then pour over the cheesecake evenly (you may need to use a spatula if you want it spread uniformly).

  • Refrigerate for 4+ hours, or overnight.  Before serving, allow it to sit at room temperature for 10 minutes so that the glaze does not crack when you cut into it. If using the caramel sauce & sea salt, you can drizzle sauce over the ganache before or after you cut the cheesecake, and the salt can be sparingly sprinkled over-top the caramel.
  • Devour....or daintily consume, the choice is yours.


Baking A Medieval Cheesecake - The History of the Sambocade

The Original Cheesecake

Medieval Cheesecake-Saffron Cheesecake

Saturday, August 10, 2019

Winner, Winner, Tuna Dinner!

A few years ago, I stumbled upon the idea (from the Toad& Co. blog/newsletter) of a Grilled Cheese Competition.  About that time my church was planning a missions trip to Guatemala and I suggested it as a fundraiser.  One of my comrades latched onto the idea, and although we never did use it, she kept it in the back of her mind.  Each year our church does SummerFest and this year they decided to change the format a bit and do dinners after the special speakers.  The aforementioned comrade saw her opportunity and pounced!  It didn’t take too much for us to convince the fun & fearless kitchen leader to make it part of the schedule.  And so it was that the “GLC Meltdown” was born. 

Originally scheduled for early June, a flood and subsequent building damage pushed the date for the “Meltdown” to the middle of July, on what just happened to be one of the hottest days of the year.  As I overheard someone say that evening, “We’re having a meltdown either way you look at it!”  The rules were quite simple: a name for your entry was required, make 2 sandwiches for judging, each entry was judged based on “creativity, presentation, and taste”.  Since I appropriated the idea, one might assume I had a submission just waiting for the go-ahead.  And even with the date being pushed, I was still down to the wire on figuring out what I would make.  I googled ideas, searched my local Aldi for cheeses (they have tons of great options), and still didn’t have anything that was striking my fancy.  With not much time I turned to my travels for inspiration.

While living DownUnder, I stumbled upon the delightful world of flavored tuna.  Spicy Chili, Mexican Style, Zesty Vinaigrette, Indian Curry, Teriyaki, Tomato & Basil, etc.  They were delicious, straight out of the can – just grab some crackers and scoop! 

Upon my return to the Southern Hemisphere I revisited this tasty past-time.  Those who are long-time readers might remember how my Taranaki house sit involved leftover foods.  Some of the items they left in their fridge were cheeses and one was goat cheese.  My last known experience with goat cheese was in France when I was about 17 and it left a bad taste in my mouth, both literally and figuratively.  However, I didn't want to waste perfectly good food (if it was indeed perfectly good), so I decided to give it a try before I threw it away.  Some hearty, whole-wheat bread, a small smear of goat cheese, and a hearty topping of Tomato Basil flavored tuna - pop it in the toaster oven... Surprise!  I rather enjoyed it.

This memory is what spawned my submission.  My only problem was that there is no Tomato Basil Tuna in the U.S.  Thanks to the world wide web I was able to find the ingredient list to a can from Australia, but without amounts of each ingredient my result would be quite unpredictable.  I decided to try Pinterest to see if someone else had already beaten me to it, but alas, I was on my own.  The closest I found was a recipe for Tuna and Tomato Pasta.  I took the additional ingredients and decided I would just wing it.  As my younger brother likes to remind me, I rarely follow a recipe exactly anyway.  Saturday night dinner was my test run, but I didn't write down how much I added of everything, so it was a one-of-a-kind dish (I made sure to save enough of the tuna for the competition the next day).  I tested four variations (amounts of goat cheese, the addition of mozzarella and provolone, and home made wheat bread) on my family and based on their votes I had my finalized entry.  The name of my entry, "Tasman Tuna Toastie" was finalized before the sandwich - yes, I enjoy alliteration. The Tasman sea separates Australia and New Zealand, and in both countries a sandwich that is grilled or melted is called a "toastie", so the name fit like a glove.

For me the competition was rather uneventful, I didn't truly feel as if I was competing - I just made a sandwich because I felt like I should.  I'm not very competitive as it is, so winning wasn't really on my radar (to be honest I thought I might be disqualified for a lack of cheese in my submission).  Once my sandwich had been delivered to the judges I took my extra sandwiches and gave them to those sitting at my table to taste.  Without telling them the name no one could figure out my ingredients.  Tuna and goat cheese weren't on their radar at all.  I then took a taste over to my comrade (although, at this point, she was not viewing me as a comrade but a foe).  She made several wrong guesses as well and then finally said "seafood" to which I replied, "tuna".  She rather enjoyed it, but I still assumed I was still out of the running.  I was shocked, and a bit incredulous, when they declared my sandwich the winner of the Golden Spatula Award.  I still feel bad that someone who really wanted to win didn't win, but I guess there's always next year...

Life's been busy, but I finally found time to recreate the recipe for the tuna - ENJOY!

Tomato Basil Tuna

2 cans (5oz/142g) tuna (I used 1 in water and 1 in oil)
3.5 Tbsp tomato paste
1 Tbsp Basil
1 Tbsp Red Wine Vinegar
1/2 Tbsp minced onion (I used dried)
1 tsp minced garlic
1/2 tsp sugar
1/2 tsp garlic powder
1/4 tsp salt
splash of white wine
~ In a small skillet, combine all ingredients and heat through. 

To make my entry, I buttered and toasted two pieces of Mack's Flax Bread™ by Silver Hills Bakery (but any hearty bread with a bit of crunch will do).  Next I topped one piece with a nice spread of goat cheese and a thick layer of tomato basil tuna.  Sprinkle on a bit of mozzarella for some extra creaminess and then top with the second piece of bread and melt everything in a skillet or on a griddle.  **At home I normally make these open-faced (no top piece of bread), so I put it in the toaster oven to melt everything.  The leftover tuna is even better the second day as all the flavors have time to marinate.


Monday, April 11, 2016

Easy Make-Ahead Breakfast


I was reminded a few weeks ago that I have not posted in a while, and I had to admit that it was true.  Life is so much busier when I'm home.  I'm about 90% done scrapbooking my year in Australia, but that last 10% is taking a disproportionate amount of my time...  I did make a trip back to Juarez, Mexico last fall, but I didn't take a computer to blog while I was there.  Anyway, someone asked for this recipe, so I figured I'd post it here and kill two birds with one stone.  The beauty of the recipe is that it only takes 5 ingredients, minimal utensils and equipment, whips up in less than 5 minutes, and is ready to eat the next morning.

  I always mix mine up the night before so that the chia seeds have time to absorb the liquid in the yogurt.  If you forgot to prepare it the night before, just let it sit for about 10 minutes and you should be fine.  You can double the batch and eat it over a few days too!

The trick to this recipe is that most container base to most blender will fit the mouth of a mason jar (regular sized, not wide-mouth).
That's how I have minimal clean-up, it's all done in one container.  Since we use lots of mason jars at our house (my Mom does a ton of canning) we keep plastic mason jar lids around, they're quite handy.  As with most recipe you can change the proportions to suite your tastes.  I've made this with cherries, raspberries, papaya, lychees, just choose what your favorite fruit - the possibilities are endless.

Did you know?  Chia seeds are a great source of calcium, vitamin C, iron, potassium, and Omega-2.  Enjoy!


Un-Granola Peach Yogurt    Serves: 1  Calories: 336

Ingredients:
1/2 cup unsweetened, plain, whole-fat yogurt*
1 whole peach (fresh or canned - if using canned, don't add any of the liquid)
2 TBSP chia seeds
1 TBSP ground flax seed
1 TBSP unsweetened coconut

Directions:

  1. Pour the yogurt into your mason jar (mine have the ounces marked on the side so it doesn't require a measuring cup) and add a peach (or fruit of your choice).  
  2. Add the blade and blender base to the mason jar and blend.  I prefer mine to be a bit more chunky, but feel free to completely puree the two.
  3. Remove from the blender and toss the blade and blender based into the sink.  I recommend cleaning them right away so nothing gets stuck, but that's up to you.
  4.  Add the remaining 3 ingredients and mix with a spoon.
  5. Screw on the lid and place it in the fridge for you breakfast the next morning.
*I make my own yogurt, no sugar, no preservatives, just whole milk & cultures
**You can also substitute yogurt for keifer (same quantity)

Keywords: Grain-free, Gluten-free, Low-Carb, Breakfast, Noatmeal, Healthy

Recipe Analysis provided by SuperTracker.usda.gov - this is for yogurt, not keifer
Total Calories: 336; 11g Protein; 35g Carbs; 15g Fiber; 18g sugar; 0g Added Sugar; 7g Saturated Fat; 2 Monounsaturated Fat; 9g Polyunsaturated Fat

Saturday, November 2, 2013

Health-Nut Oatmeal Muffins

I've been working with this recipe from Sugar-Free Mom (that I found on Pinterest) for quite a while now and decided I'd share my tweaks with you all.  She calls them Personal Sized Baked Oatmeal, but I only ever make them as muffins (they make a great snack at work).  Sadly, she takes much better photo's than I do....  The recipe is great as is, but I didn't really like the banana taste and wanted to make it a bit healthier so here's what I've got.  The original recipe is really easy to adapt - so go for it!


Ingredients:
1/4 cup of Chia Seeds
1/2 cup of water
2 eggs
1 teaspoon vanilla
2 cups of applesauce (unsweetened) *I used home-made
**you can add some shredded zucchini if you like, decrease the amount of milk if you do
1/2 cup of honey (I usually use a bit less)
2 cups of rolled oats
2 cups of cooked quinoa *I usually cook mine the night before or use leftovers
1 teaspoon salt
3 teaspoons baking powder
1/4 cup of flax meal
1 tablespoon ground cinnamon
1 ¾ cups milk
1/2 cup chopped nuts (whatever kind you like)
10-12 oz. dark chocolate chips


Directions:

  1. Mix your chia seeds and water together in a bowl and let sit (stir occasionally so they're evenly soaked).
  2. Mix eggs, vanilla, applesauce, and honey together in a bowl (you would add your shredded zucchini now if you want - I've used frozen & fresh).
  3. Add in oats, quinoa, chia seeds, salt, baking powder, flax and cinnamon  - mix well with wet ingredients.
  4. Preheat oven to 350 degrees.
  5. Pour in your milk and mix well to combine everything - don't worry, the batter will look runny.
  6. Add in your chopped nuts & chocolate chips (you could also use fresh, frozen, or dried fruit too).
  7. Put your cupcake liners in your muffin tin (spray with cooking spray if not using liners). This recipe usually makes about 24-30 muffins.
  8. Use a 1/4 measuring cup to fill your muffin cups - they don't raise, so fill them full.
  9. Bake for about 32 minutes or so.
  10. Cool for about 5 minutes and take out of the pans (I've found that if you let them cool in the pan too much condensation builds up).
I make a batch and keep 5-6 in the fridge for the week (I take them to work for a healthy snack) and freeze the rest, taking out 5 more every Monday morning until they're gone.  Enjoy!  


Muffin (noun)

An individual cup-shaped quick bread made with wheat flour, cornmeal, or the like and baked in a pan (muffin pan) containing a series of cuplike forms